

Understand Navigation Menus
Ever landed on a site where you had no idea what to click next? That’s a sign of a missing or messy navigation menu. In WordPress, your menu acts like a site map, guiding visitors from your homepage to blog posts, pages, and even external profiles. Getting your WordPress menu setup right means happier readers and lower bounce rates.
Here’s what you’ll learn in this guide, step by step:
- How to create a menu in WordPress
- Where to assign it so it shows up on your site
- Tips for dropdowns and bonus plugin ideas
Prepare Menu Structure
Before diving into the dashboard, sketch out what links belong in your main menu. Common items include:
- Home and About pages
- Blog categories or specific posts
- Custom links (like social profiles)
- Contact or Call-to-Action pages
Keep it simple, aim for 5–7 top-level items. Too many options can overwhelm visitors.
Create Your First Menu
Go to Appearance Menus
- In your WordPress dashboard, head to Appearance → Menus.
- If you’re on a block theme, click Editor under Appearance, then select the Navigation block.
Name Your Menu
- Enter a clear name in the Menu Name field, like “Main Menu” or “Header Nav.”
- Click Create Menu.
Add Menu Items
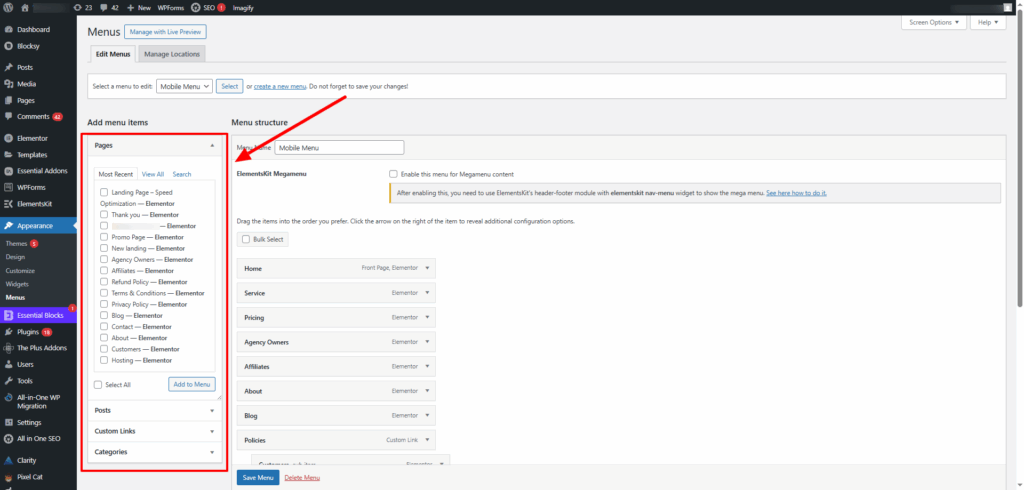
- Look at the panels on the left: Pages, Posts, Custom Links, Categories.
- Check the boxes next to the items you want to include, then click Add to Menu.
- Drag and drop menu items to reorder them.
Assign Menu Location
Choose Display Spot
Most themes offer locations such as Primary, Header, Footer, or Social Menu. In the Menu Settings or Menu Locations tab, check the box for where you’d like this menu to appear.
Save Your Menu
Click Save Menu. Now head to your site’s front end and refresh the page—you should see your new navigation bar in action.
Add Dropdown Features
Want submenus for a cleaner look? Here’s how to set up dropdown navigation.
Create Submenu Items
- In the menu editor, drag an item slightly to the right beneath a top-level link.
- It will indent and become part of a dropdown.
Make Unclickable Parent
Sometimes you need a parent menu item that just holds a submenu, not a real link.
- Choose Custom Links.
- Enter
#in the URL field and your label in Link Text. - Add it to the menu, then nest child items under it.
Explore Menu Plugins
If you need extra style or mega-menu functionality, check out popular options:
| Plugin | Feature Highlights |
|---|---|
| Max Mega Menu | Drag-and-drop builder, widgets in menus |
| Responsive Menu | Mobile-first design, touch-enabled |
| UberMenu | Advanced styling, dynamic item generation |
| WordPress Mega Menu | Prebuilt templates, easy customisation |
For a full list and reviews, visit Kinsta’s roundup of top WordPress menu plugins.
Troubleshoot Common Issues
| Symptom | Possible Cause | Fix |
|---|---|---|
| Menu not appearing | No location assigned | Go to Menu Settings, check at least one location |
| Dropdown items not showing | CSS conflict or theme limitation | Switch to default theme, test dropdowns |
| Custom links not working | URL field left blank or # missing |
Edit link, ensure URL or placeholder # is correct |
| Unable to add new pages | Screen Options filtering items | Click Screen Options at top, enable Pages panel |
Key Takeaways and Next Steps
- Plan your menu structure before building it
- Create and name your menu under Appearance → Menus
- Assign it to a theme location so it shows on your site
- Use nesting for dropdowns and custom links for unclickable parents
- Consider a plugin for advanced mega-menu features
Now that you’ve mastered how to add a navigation menu in WordPress, go ahead and tweak your links, reorder items, or try a new plugin. If you’re still setting up your site’s foundation, check out our guide on how to create a website with WordPress next. Have any menu hacks or questions? Drop them in the comments below!