


Are you ready to make it easy for visitors to reach you? Adding a contact form on WordPress gives people a simple way to send messages, book appointments, or register for events. In this post, you’ll learn exactly how to add a contact form on WordPress, no coding required, promise. By the end, you’ll have a working form that fits your site style and gathers submissions reliably.
Pick Your Approach
Before you dive in, think about how you want to add contact form WordPress. You have two main options:
- Use the built-in Form block, no extra plugin needed
- Install a dedicated plugin for more features
Not sure where to start? If you haven’t set up your site yet, check out our guide on how to create a website with WordPress.
Use The Form Block
WordPress now includes a native Form block that covers basic needs—great for simple contact pages.
Enable The Form Block
- Open any page or post in the block editor.
- Click the plus icon and search for “Form.”
- If the block is missing, install the free Jetpack plugin first—this restores the block on self-hosted sites.
Add And Configure Fields
- Click each field label to edit names and placeholders.
- Use the right sidebar to add or remove fields (email, phone, dropdowns).
- Under “Form Settings,” choose what happens after submission—display a message, send to an email address, or redirect visitors.
Once you’re happy, hit Publish or Update to see your form live.
Install WPForms Plugin
For more flexibility, think file uploads, conditional logic, spam protection—you’ll want the best contact form plugin for WordPress beginners.
Add The Plugin
- Go to Plugins → Add New in your dashboard.
- Search for “WPForms Lite” and click Install Now, then Activate.
Create Your Contact Form
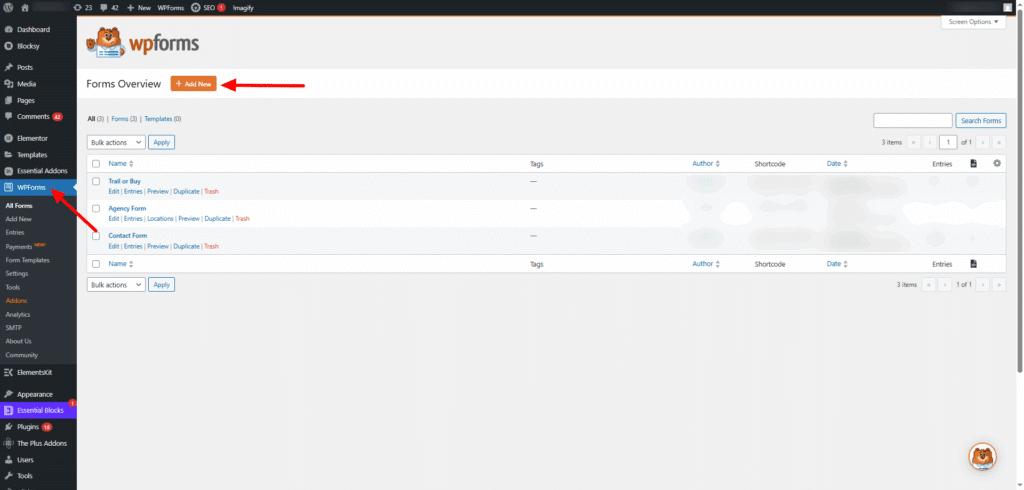
- In the sidebar, click WPForms → Add New.
- Choose a simple Contact Form template.
- Drag and drop fields—name, email, message, or file upload.
- Under Settings → Notifications, set the email where you’ll get submissions.
- Save your form.
WPForms Lite is recommended by WPBeginner for beginners. You’ll get basic fields, email alerts, a thank-you page, and honeypot spam protection. To unlock reCaptcha, dashboard entry storage, or conditional logic you can upgrade to Pro.
Pick The Best Plugin
Want more options? Here’s a quick comparison of top form plugins:
| Plugin | Price | Spam Protection | Entry Storage | Ease of Use |
|---|---|---|---|---|
| WPForms Lite | Free | Honeypot | Email only | Very beginner-friendly |
| WPForms Pro | From $49.50/yr | Honeypot, reCaptcha | Dashboard & DB tables | Drag-and-drop |
| Contact Form 7 | Free | reCaptcha add-on | Email only | Basic text setup |
| Gravity Forms | From $59/yr | reCaptcha | Dashboard & DB tables | Developer-focused |
| Fluent Forms | Free & Pro | reCaptcha | DB & Media Library | Rich feature set |
Embed Your Form
Once your form exists, add it to any page or post.
Insert Block Or Shortcode
- Block Editor: click plus, choose WPForms, then select your form.
- Classic Editor or widgets: copy the shortcode from WPForms → All Forms and paste it where you like.
Hit Update and preview to confirm placement.
Test And Troubleshoot
Before you share the link, make sure everything works.
Check Entry Storage
- Lite version sends entries to your email only.
- Pro stores submissions under WPForms → Entries.
Fix Email Deliverability
If you’re not getting messages, try the WP Mail SMTP plugin to connect with services like SendGrid or Amazon SES.
Review Key Takeaways
- Use the Form block for basic contact needs—install Jetpack if it’s missing.
- Install WPForms Lite for an easy drag-and-drop builder and spam protection.
- Compare plugins if you need advanced features like conditional logic or file uploads.
- Embed via block or shortcode, then test submissions and email delivery.
Ready to let your visitors reach you with zero fuss? Pick one method today and watch your inbox fill up—good luck!