

You’ve got great content ready, but you’re not sure where to put it in WordPress. Adding pages in WordPress is easier than it looks, and in minutes you can have an About page, Contact page, or any static content live on your site. In this guide, you’ll learn step by step how to add pages, publish them, and even set up a blog page.
By the end, you’ll be comfortable navigating the Pages screen, configuring settings, and shining up your site structure.
Page vs Post
Before you add pages in WordPress, let’s clear up the difference between pages and posts.
- Pages are static, timeless pieces like Home, About, or Contact.
- Posts are time-based entries such as blog updates or news articles.
| Feature | Page | Post |
|---|---|---|
| Chronology | No date association | Displays by publish date |
| Taxonomy | No categories or tags | Uses categories and tags |
| Hierarchy | Can have parent and child pages | Flat structure |
| Use case | About, Services, Contact pages | Blog articles, news, tutorials |
Ever mixed them up?
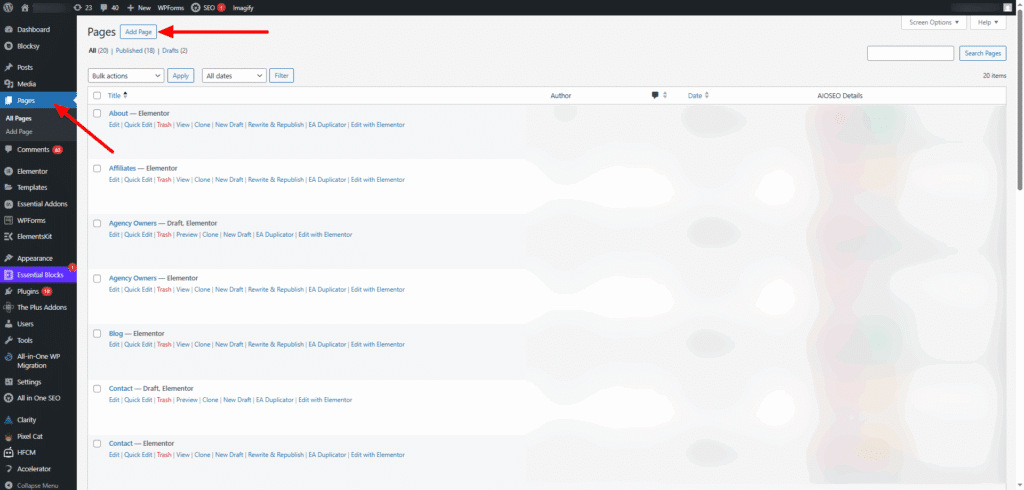
Access Pages Screen
Ready to dive in? First, let’s find where to manage all your pages.
- Log into your WordPress dashboard.
- In the left menu, click Pages.
- You’ll see a list of existing pages and options to add new ones.
This screen comes from WordPress core, and it handles unlimited pages on your site.
Add A New Page
Now that you’re on the Pages screen, let’s create your first page.
- Click Add New at the top.
- Enter your page title in the H1 field (this becomes the page URL slug.)
- Add your content in the block editor. Use headings, paragraphs, images, or lists.
- Save as Draft to come back later, or move on to settings.
Configure Page Settings
On the right sidebar, you’ll find vital page options. Tweak these before you publish.
- Status & Visibility
- Switch between Draft, Pending Review, or Published.
- Make a page Private if you don’t want visitors to see it yet.
- Permalink (slug)
- Click Edit to customize the URL part after your domain.
- Page Attributes
- Choose a Parent page to nest pages under it.
- Select a Template if your theme offers custom layouts.
Set A Featured Image
A featured image often shows at the top of your page or when shared on social media. Here’s how to set one up:
- In the sidebar, click Featured Image.
- Click Set Featured Image.
- Upload or select an existing image from your Media Library.
- Hit Set Featured Image to confirm.
Publish A Page
Wondering how to publish a page on WordPress? It’s simple.
- Review your content and settings.
- Click the blue Publish button in the sidebar.
- Confirm by clicking Publish again.
Your page is now live. If you need to schedule it, click Immediately and pick a future date and time.
Assign A Posts Page
If you want a dedicated blog index, here’s how to add post page in WordPress:
- Create a blank page (eg, “Blog”) following the steps above.
- Go to Settings → Reading.
- Under “Your Homepage Displays,” set Homepage to a static page if needed.
- In the Posts Page dropdown, select your “Blog” page.
- Save Changes.
Now all your posts will appear on that page in reverse chronological order.
Convert Post To Page
Sometimes you may want to turn an existing post into a page. You can do this manually:
- Copy the post content in the editor.
- Create a new page and paste the content.
- Adjust the title, slug, and settings.
- Delete or unpublish the old post if you no longer need it.
This quick copy-and-paste method keeps your formatting and media intact.
Next Steps
- Up next, learn how to create blog post WordPress style—add categories, tags, and featured images to your posts.
- If you’re just getting started, check out our guide on how to create a website with WordPress.
- Experiment with parent and child pages to build a clear site hierarchy.
You’re all set to add pages in WordPress and make your site shine. Go ahead, publish that About page, and show the world what you’ve got!